

Introduction: Glow Table


Really light up your next dinner party with a table that glows in the dark!
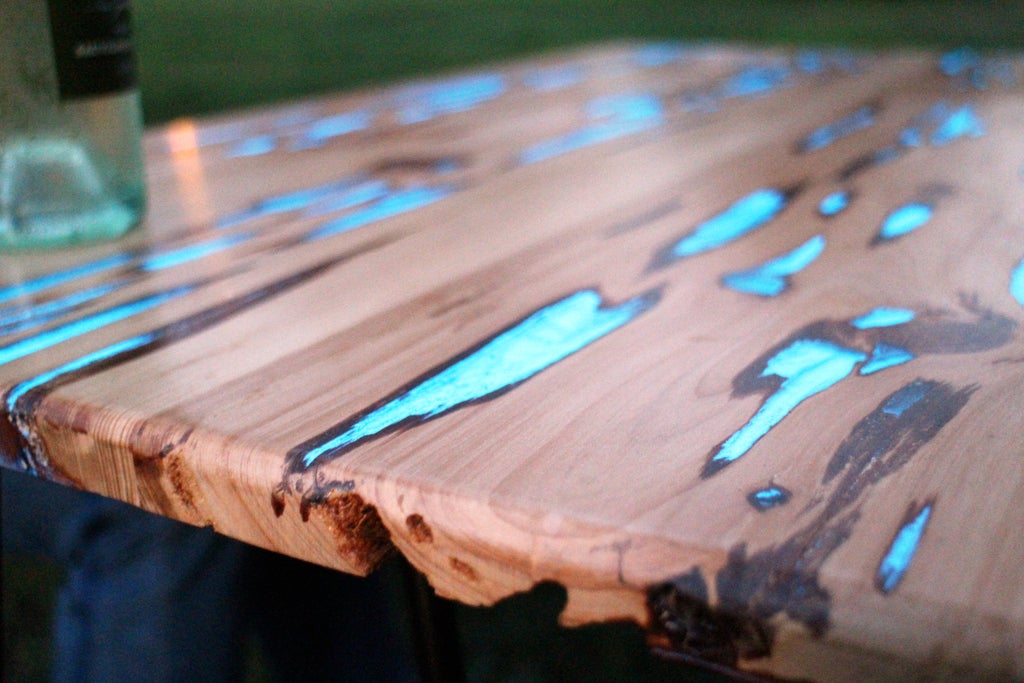
Photoluminescent (glow) powder mixed with clear casting resin fills the naturally formed voids in Pecky Cypress hardwood, creating a unique and stunning table. The glow powder charges up in sunlight and emits a cool blue glow when in partial or complete darkness.
Placing this table near a window will allow it to collect rays from the setting sun and then set off a pleasant glow from the transition from twilight to evening. Making your own is fun as you can customize it in any way you want. Instead of using hardwood you can use the technique of adding glow powder to resin to cast in all kinds of fun ways.
Let's make!
Step 1: Materials

The type of wood I used for this table is known as 'pecky cypress', which is regular cypress that has been naturally damaged with a fungal growth inside causing sections to rot - wiki on taxadium distichum (cypress).
These damaged pockets can be easily removed and create cavities in the wood which are perfect for filling with resin and glow powder. The pockets of damaged (rotten) cypress are soft and can easily be removed with compressed air and some light digging with a hand tool.
Aside from Pecky Cypress, we'll need:
Step 2: Mill Wood

The wood comes from the mill to the store in rough shape, it's up to you as the consume to decide how you want the product to look. In North America most board lumber is sold in board feet.
Knowing I was going to make a table top by joining a few boards, I grabbed a few lengths of the Pecky Cypress and used a jointer to square the edges of both sides of the board. These clean edges will make a great surface to bond the planks together.
Step 3: Cut Planks to Size


With the board edges finished I could cut the boards to the correct length.
After marking each board to the desired finished length I cut them down to size with a sled on the table saw.
Step 4: Join Planks to Make a Board


Using a plate joiner (biscuit cutter) I cut indents into the boards, then I glued in biscuits and clamped the boards together. To ensure the boards stayed even while being clamped I used a few scraps of straight wood on the top and bottom of the boards.
I let the glue dry overnight.
Step 5: Dig Out Fungus Rot


The damaged pockets of wood in Pecky Cypress can be easily removed by gently digging with small tools to clean out the cavities.
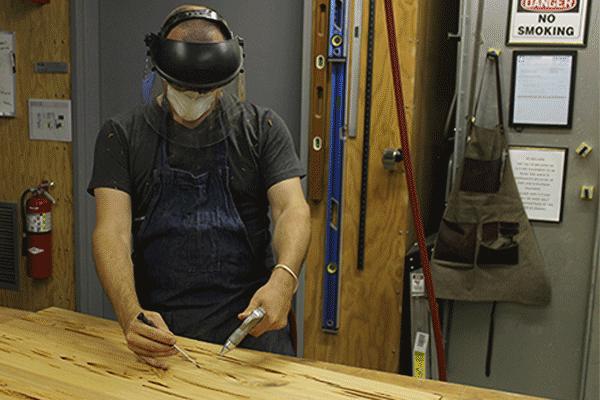
Starting with a vacuum I gently pushed a flat-headed screwdriver into each rotted cavity to dislodge the rot and remove it. After, I used compressed air to blast out any remaining debris and ensure the cavity was clear of detritus.
This can get very messy and dusty, so wear proper safety equipment.
Step 6: Sand Surface

After the glue has dried I sanded down the surface with a course 80 grit sandpaper on a random orbital sander. This cleaned up the transition between the glued boards. After, I brushed the surface clean to remove any dust. We'll need a super clean surface before we can move on to casting with resin.
Step 7: Mask and Prepare Board for Resin


Before casting resin we need to ensure the table will be able to retain the medium. Since some of the cavities in the boards go all the through the entire underside was taped off, that way any resin that goes to the bottom will pool and not leak out.
To keep the resin from oozing out the ends I put scrap strips of thick acrylic along both ends. I didn't worry about the sides, as these boards didn't have any open cavities along the sides. The acrylic scraps were clamped into place and a short border of masking tape was put along the sides, just in case any resin migrated.
Step 8: Resin and Glow Powder


I used clear casting resin![]() , which is a 1:1 ratio type - meaning you don't need to measure out specific amount of catalyst, just equal parts resin and catalyst. I prefer this method as I'm not very careful and have mixed up the mix ratio before. This resin is super easy to use and begins to set in about 7 minutes.
, which is a 1:1 ratio type - meaning you don't need to measure out specific amount of catalyst, just equal parts resin and catalyst. I prefer this method as I'm not very careful and have mixed up the mix ratio before. This resin is super easy to use and begins to set in about 7 minutes.
There's plenty of glow in the dark powder colours available, I chose blue glow in the dark powder![]() which I got online. I'd recommend using more glow powder than less, as the effect is much more striking.
which I got online. I'd recommend using more glow powder than less, as the effect is much more striking.
For my 41"x22" table I used 64 oz (2 liters) of casting resin and about 3.5 ounces (100 g) of glow powder. Yours measurements will probably vary.
Step 9: Prepare Resin


To mix my resin I used large unwaxed paper cups. Pour equal portions of resin and catalyst into separate cups, ensuring to fill cups less than halfway full. Pour a portion of glow powder into either cup and mix thoroughly.
Know that when you combine the two liquids of the resin the chemical reaction will start, allowing you only about 5-7 minutes of working time before the resin sets.
When you're ready add the catalyst to the resin and briskly stir until the two liquids are one homogeneous mixture. Ensure to scrape the stir stick, and the sides and bottom of the cup. Pour the stirred mixture into the catalyst cup and continue stirring. The entire mixing process should take less than 2 minutes to ensure you have enough time to pour the resin without it setting.
Step 10: Pour Resin


With your resin mixed it can be poured into the cavities of the Pecky Cypress. Since the resin is not viscous enough to suspend the glow in the powder I had to take quick breaks from pouring to stir the mixture to ensure even glow powder distribution.
Gently pour the glow resin into all wood cavities. You may find that the resin gets absorbed into the wood, or that some cavities are slower to fill, this is normal. You can apply another layer of resin over previously poured sections.
I poured in smaller measures, about 10 pours in all. This process took about an hour to complete. I let the resin cure completely overnight.
Step 11: Let Resin Cure, Then Reveal


After allowing the resin to cure completely overnight the acrylic edges and masking tape can be removed.
The resin won't stick to the acrylic, allowing it to be easily peeled from the ends. The masking tape was a little more tricky, but can be easily removed with a little patience.
Step 12: Preliminary Glow Test


Eager to test out the results I took the cast resin table top outside and let it soak in some sunshine for about 5 minutes, then quickly took it inside an enclosed area and turn off the lights. The effect was incredible!
Picture 1 shows the table with the additional resin spill over in complete darkness. There is no photo trickery here, this picture is exactly as it appeared when the lights were off. If anything, the effect in person was more vibrant.
Picture 2 shows the same table top with the door slightly ajar, allowing some natural light to enter into the room. Here you can see the resin spill over next to the vibrant blue and grain of the wood.
Step 13: Clean Up Edges

Along the edges where the resin touched the acrylic or masking tape were small sections of raised resin due to capillary action. Even though the edges are going to be routed smooth, removing these raised edges now makes the sanding process easier. I used a sharp knife to cut away the raised edges.
Step 14: Rough Sanding


I have access to a 25" drum sander. This sander has a very rough grit and is great at plowing through large flat pieces like table tops. However, this machine is totally not required and you can work the table top to a smooth finish by just using a power sander.
I fed this table top through multiple times, each time raising the bed a small amount until the entire surface was level.
Step 15: After a Few Passes

After a few passes through the drum sander the table surface has been leveled and the resin spill over high spots are removed. Now we need to bring the resin surface back to a high gloss, and smooth out the wood surface.
Step 16: Finish Sanding


Using a random orbital sander I sanded from rough grit all the way up to 400 grit.
Since the drum sander I used had a 80 grit sandpaper, I started at 120 grit then stepped up progressively until I was at 400. Spending enough time with each grit of sandpaper to ensure a uniform finish.
Step 17: Fence for Routing


After the surface was sanded I could turn my attention to the edges. Though my router bit had an end bearing to keep distance from the table edge, the holey nature of Pecky Cypress made uniform distance on the edge impossible with an end bearing, meaning the blade of the router would occasional dig into the table more where there was a cavity on the table edge. To solve this I made a fence for the router.
With the rounderover bit installed in the router I measured the distance from the edge of the end bearing to the edge of the router base, this distance would be the setback for the fence. I clamped a straight edge fence at this setback perpendicular to the edge of the table sides.
Step 18: Routing Edges


With the fence installed I could run the router over the table edges to make a nice rounded edge.
Step 19: Polyurethane Finish

After routing and sanding I could finally apply a durable glossy polyurethane finish. In a well ventilated area I applied a coat with a foam brush and allowed it to dry completely.
Step 20: Wet Sand

To achieve a high-gloss finish I wet sanded in between coats of polyurethane. Once one coat was completely dry I sprayed the surface lightly with water, then used a 1200 grit sandpaper to smooth out any brush strokes from the previous coat of polyurethane.
The surface was then cleaned and dried completely before applying another coat of polyurethane. This process was repeated several time to achieve a very high gloss finish.
Step 21: Paint Leg Anchor Plate


With the top finished I could turn my attention to the base. I used retro hairpin table legs![]() for my table (the ones in the link were cheaper to buy with a table top than just the legs). These legs bolt into the table bottom. Since this table design is different than the one the legs were designed for I had to make a new way to anchor them to the table.
for my table (the ones in the link were cheaper to buy with a table top than just the legs). These legs bolt into the table bottom. Since this table design is different than the one the legs were designed for I had to make a new way to anchor them to the table.
To hide the leg attachment and really keep the focus on the glowing table top I decided to paint the leg anchor plate flat black.
Step 22: Transfer Anchor Openings

Once the paint on the leg anchors was dry I placed the anchor plates on the underside of the table and transferred the opening location to the table. An opening was drilled at the marks, ensuring to only drill as deep as the anchor nuts.
Step 23: Add Anchor Nuts + Plate


The anchor nuts were installed in the openings, then the anchor plate was installed over the anchor nuts. Since the Pecky Cypress had irregular cavities some minor tweaks were needed to ensure the bolts and anchor plates had sufficient coverage on the underside of the table.
I used E-6000 Industrial Strength Adhesive![]() which bonds almost anything to anything else permanently. This stuff is nasty, but magic.
which bonds almost anything to anything else permanently. This stuff is nasty, but magic.
Step 24: Attach Legs


When the adhesive has dried completely the hairpin legs can be installed. Align the legs and screw in the anchor bolts to secure the legs to the underside of the table.
Step 25: Place Your Table + Glow!


Your table is all set to glow the night away. This glow powder needs UV light in order to activate, so dusk is a great time to enjoy the transition.
This table has a really neat effect, and looks great even in twilight. Depending on how much UV exposure your table has it can glow for up to 20 minutes.

Participated in the
Wood Contest

Participated in the
Make it Glow!


